
Every year, at each seasonal change I walk around the shops and I feel a mix of emotions. I absolutely love celebrating the different seasons and making them special for my children. At the same time, I feel physically sick when I see so much colourful plastic on the shelves, that will no doubt end up in landfill in a few weeks time. Easter too is becoming more and more commercialised, and as well as the usual (often plastic-laden) chocolate eggs, there are shelves dedicated to plastic crafts and novelty goods.
Parenting is the hardest part of my eco-friendly journey. I will do my best to educate my children, and I hope they follow in my footsteps but I really believe that they need to choose their own path too – and this is where my morals are no longer vibrant shades of black and white, but a guilty, murky shade of grey. Whether I am letting them follow their heart and buy a novelty plastic ball from a gift shop with their money, or trying to steer them to a more eco-friendly but less attractive (to them) option – whatever I do makes me feel a little guilty.
Easter Bonnets from Scrap & Recycling
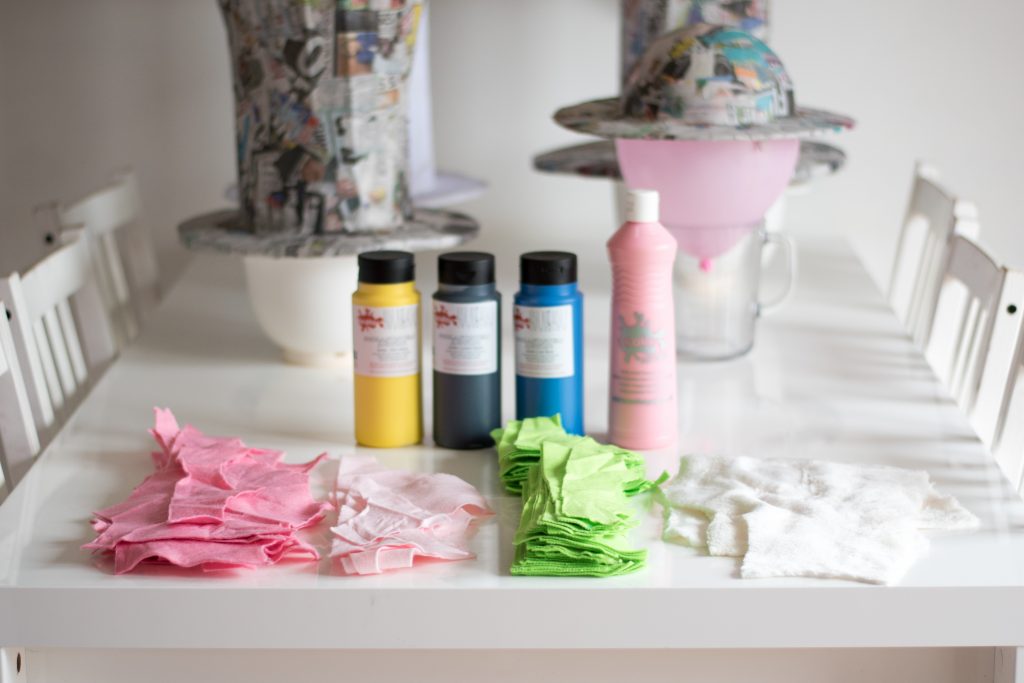
When our school challenged us to make an Easter bonnet, I decided to try and source all our materials from either our own recycling or a local SCRAP store. Our local scrap store is a community-based project that sells all manner of goods that would usually end up in landfill, whilst supporting & and providing valuable opportunities for vulnerable adults with learning disabilities. We bought offcuts of felt, some fake fur & some paints – enough to complete our projects & a good compromise.
Our inspiration
The first thing we did was to look at Pinterest for ideas. This may also have been our first mistake because we ended up with quite elaborate designs!
 |
 |
 |
 |
Pikachu | Bunny Ears | Batman | Sheep
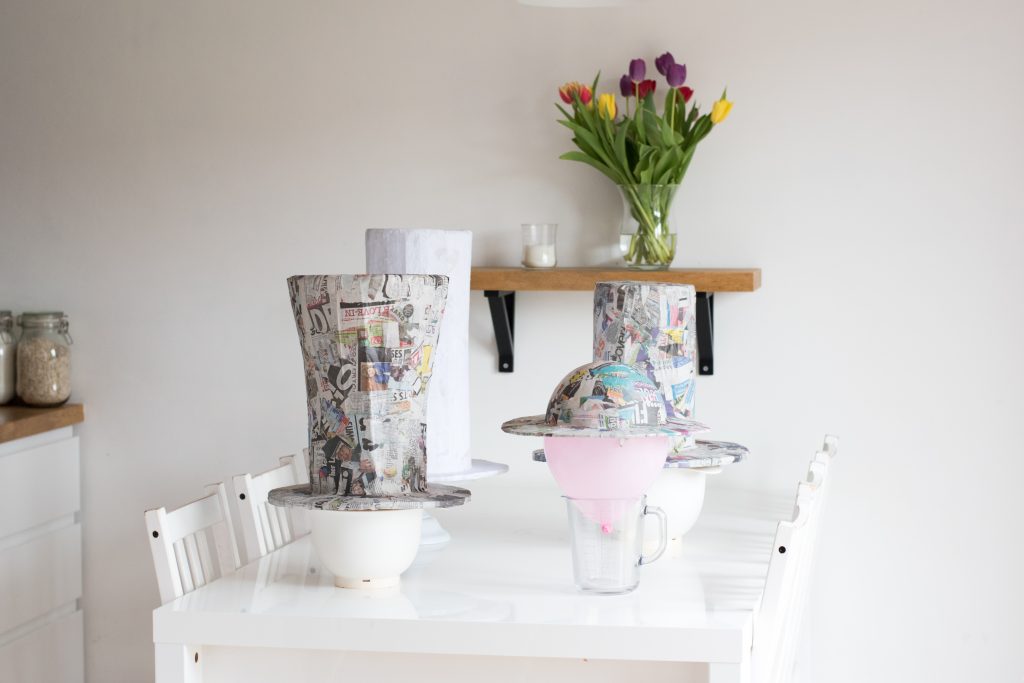
Building the hats
The children all chose the shape of the hat they wanted, so the next step was to build the actual hat. – We used the Mad hatter guide we used for Lily’s hat last year, and we just kept the top straight for the taller hats. For the sheep hat we cut a brim shape out of cardboard and found a party balloon left over from a birthday the week before*. We placed the balloon through the hole in the cardboard, to create a hat shape. Mr. T and I did the cutting, mainly because the cardboard was so thick we needed to use a scalpel!
We then used paper mache on all the hats, so they were ready to paint. This took a few hours and was very, very messy! All the children enjoyed this step, even James who was a little reluctant to join in with the hat-making at first.
*Balloons are another grey area for me – we have moved away from the mylar balloons that last forever but the children are still drawn to these ones. I bought this one without realising – it was part of a gift pack with a last-minute birthday badge we bought!
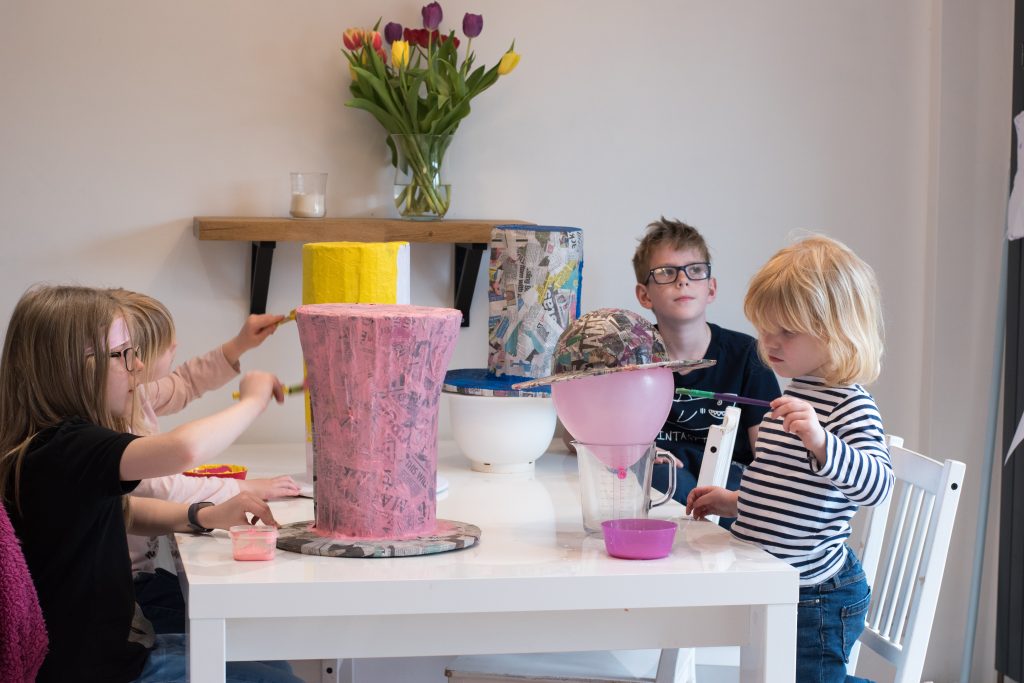
Painting the hats.
The next step was the paint the hats! (All except Ava who was helping me do another round of paper mache). Lily’s paint was a different brand and didn’t cover the paper mache so well. I think Lily actually did about 8 coats on her hat (and because we were running out of time, I did 2 coats while she was at school!)
We started to paper mache Amy’s hat first before we collected some newspaper. We papered Amy’s hat in normal white paper. This turned out to be brilliant as it only needed 2 coats of paint!
The fiddly bits & the finished results
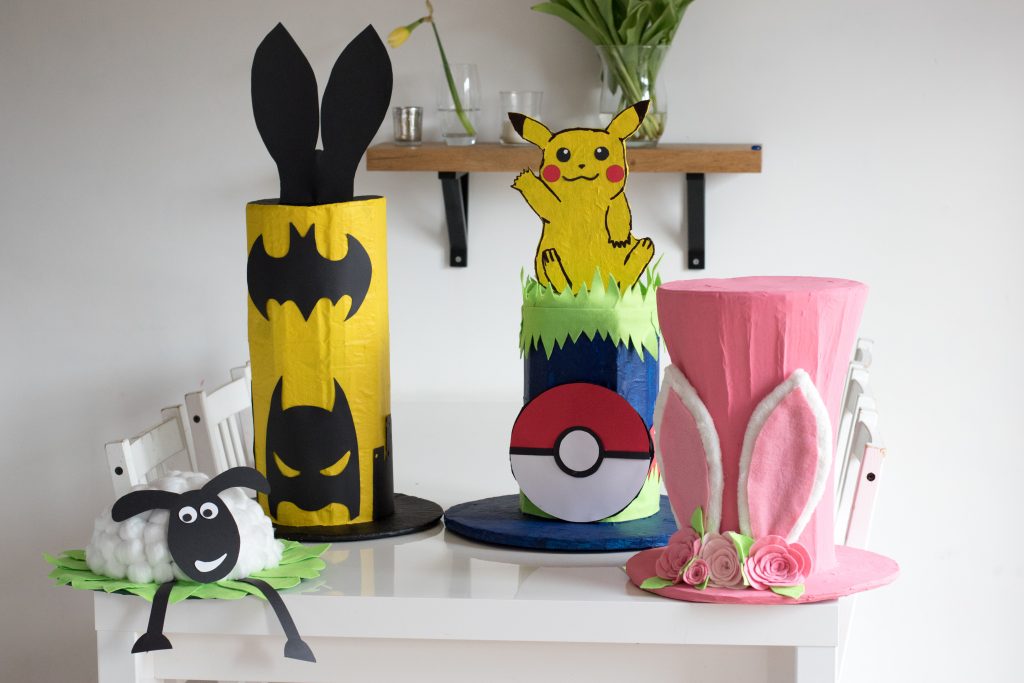
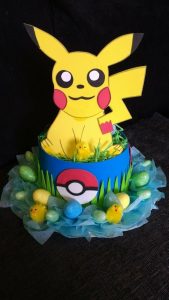
James’ Pokemon Easter Bonnet (aged 9)
This hat was probably the fiddliest, James had to cover the Pokeball, Pikachu, and Pikachu’s tail in paper mache, and then paint them all around 6 times (backs and fronts) so maybe more, and they were fiddly! He had a bit of a disaster with Pikachu’s tail when it bent in half – which is why we decided on a 3D tail to give it some strength – and I helped because we were running out of time to dry & paint the tail in time for the parade.
James also isn’t a huge fan of colouring so we adapted & decided it would be better to cut and stick the easter eggs & the Pokeball – he used a stamp to cut out the small stars. He found it hard to cut the felt grass but persisted and I gave him a hand to cut out some of the grass & other card shapes. We ran out of glue at a critical point on James’ hat, so I stuck the grass with a strong contact adhesive the night before the Easter Parade. I really wanted James to do this himself, but it was past 8 pm didn’t want to end up in A&E with fingers glued together!
I’m really proud of how James’ hat turned out, mostly because crafting isn’t really his thing, and if he could have done this whole project on his computer, he would! But he showed lots of resilience and determination, even staying up late two nights to finish coats of paint. He really enjoyed the painting and the paper mache (although I didn’t enjoy finding his used paintbrushes, or where he decorated our white hallway with blue paint!) He didn’t enjoy the fiddly bits!
Lily’s Bunny Ears Easter Bonnet (aged 8)
Lily definitely needs an award for the most coats of paint on one project! The flower petals she cut individually out of felt and we stuck together – we were both really happy with how they turned out.
Her dad helped her cut the bunny ears out of cardboard – even I struggled to cut, the card was so thick! We covered the ears in the soft fur fabric from the scrap store and Lily used the hot glue gun to glue the pink felt to the fur.
Lily worked really hard on her hat, most of the time working independently with us only helping to cut and to supervise/help with the hot glue gun and a little bit of paper mache help from Amy. She did a fantastic job of covering all the holes with the paper mache which was fiddly, and she persisted with painting even when she was the only one working on her project and everyone else was playing.
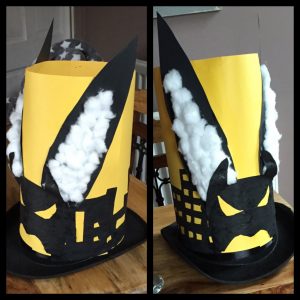
Amy’s Batman Hat (aged 6)
I was surprised that Amy chose a Batman hat! It was the first one that caught her eye, and she refused to consider any other. I did suggest a unicorn hat the next day, and we nearly had it planned, but realised that we had only bought yellow/black/blue/pink paint and would struggle to make a unicorn from those colours!
Lily, Amy, and I all worked together to paper mache Amy’s hat, but took a lot of time and care to paint it herself carefully. Simon & I cut out the Batman mask and bat symbol as we had just worked on a similar design for James the previous week for a themed day at school. Amy helped choose the buildings and windows for the silhouettes, but we again had to use a scalpel to cut these out so we cut these for her!
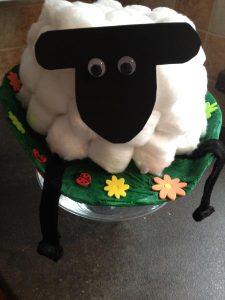
Ava’s Sheep Hat (aged 3)
Ava helped with the paper mache and she stuck all the cotton wool balls onto her hat. Then she chose a shape for her sheep’s face, told me he needed a smile, and abandoned me to play on the trampoline! The cotton wool balls were our only non-scrap purchase for this project – and only because I ran out of time to find a suitable alternative.
The grass was the trickiest part of Ava’s hat, working with offcuts it was hard to find pieces that fit.
Finished at last!
I am so proud of our results, and I hope the children are proud of their hard work too! It has been lovely working together as a family and spending time creatively. It’s also been really nice to plan and carry out a project over a number of days – especially when we live in a world of instant gratification. James & Lily must have put at 6/7 hours of work in over the weekend and 3 weeknights. I think need a medal too for leading the charge after school, especially as two of those nights I was parenting solo, and the children had other homework and after-school clubs as well as needing the familiar teatime and bedtime routines!
We didn’t win anything this year, but the competition was tough and it’s not really about the winning – it’s the taking part that counts. The smiles from all the children and their friends were amazing to see, as well as the creativity & thought that had gone into some of the designs were brilliant! We have decided to salvage and save some of the materials from this year, just in case they can be reused again in future years. The flowers we will use to decorate our easter shelf.
We hope you get some ideas and inspiration for a more eco-friendly Easter. Whilst ours wasn’t eco-perfect (hello cotton wool balls, paint & glue), it was much closer than it could have been.
Happy Easter!
Hannah & the team.